


By: Honey
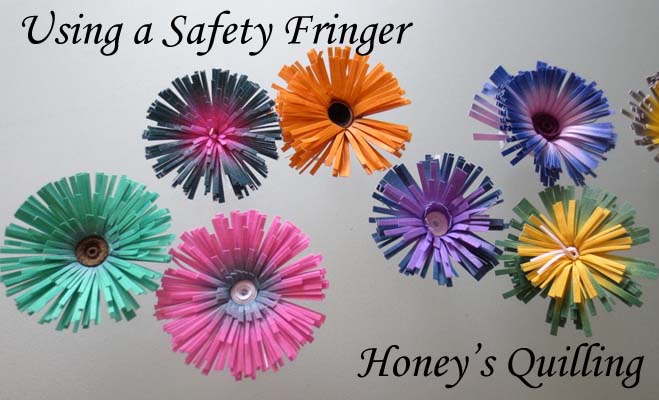
I am excited to share this post with you today! I’ve been meaning to have it up for a few weeks, but if you are a regular reader you may have noticed that I haven’t been posting quite as much as usual. It’s been a busy past few months around here!
A couple months ago I was contacted by Jonathan Mayne, a producer of unique quilling products in Australia. I had seen his website and products online before, but had never had the chance to purchase any of them myself, and I didn’t sell them when I owned my quilling supply shop either. Jonathan kindly offered to send me one of his new safety quilling fringers and some cool papers to make fringed flowers, to review for the blog. That was a no brainer, I was so excited and said yes!
My experience with using a quilling fringer is limited to the standard all metal fringer. I received it as a tool sample when I had my quilling shop, but I found it difficult to use, so I didn’t sell them and I never bothered using it again. I thought it was cool, but too much of a bother.
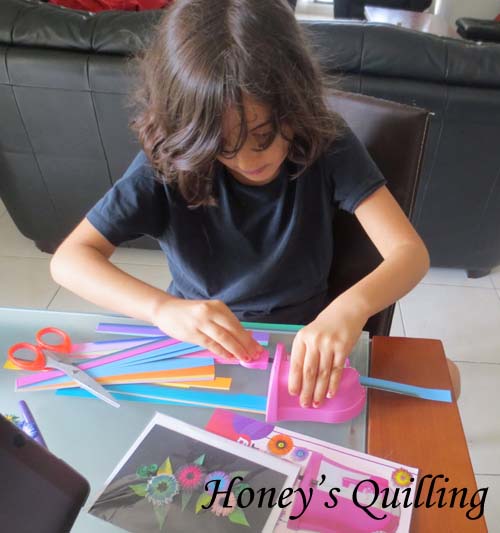
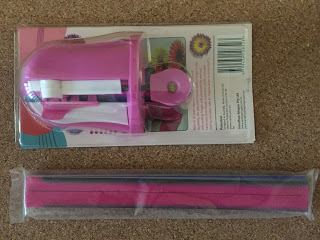
I received my Safety Quilling Fringer in the mail about a week later (so quick!) and I was impressed by the nice packaging, the nice design, and the cool papers. My daughters were equally as eager to try it out. Luckily we had a project to do that we could use a bunch of flowers for, so it was the perfect timing to fully test it out! We fully read the instructions (which come with a nice story of the history as well).
Overall I found this tool easy and enjoyable to use! In this section I’ll cover the basics of how to use it.
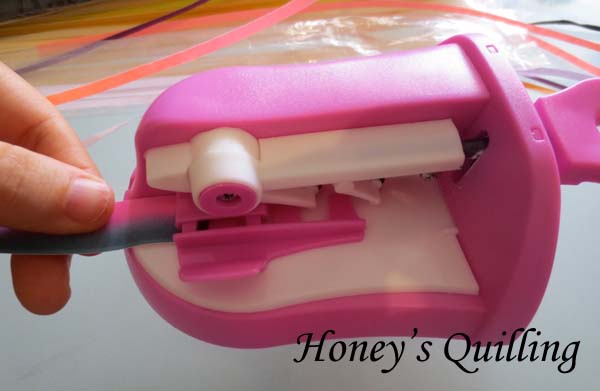
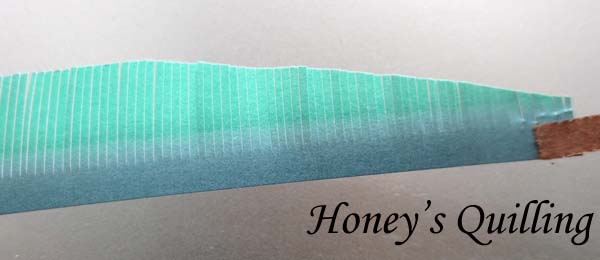
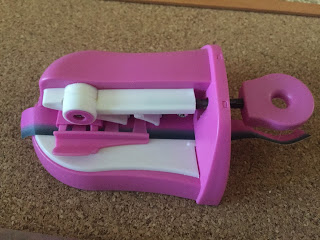
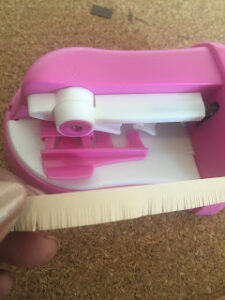
I am embarrassed to say this, but at first I was not sure whether to insert the paper strip from the left or from the right where the blade is. It had been a few years since I’ve used my other little fringer. Luckily I soon realized that you insert the paper from the LEFT, not by the blade. See the photo below for how to insert your paper strip. I found that the end of the paper strips needs to be perfectly flat, no wrinkles, in order to insert properly. If the end of the paper sticks up a tiny bit, make sure it is straightened, or even curved downward a little, instead. If it is curved up even a tiny bit, it will catch on the little rollers and parts to hold the paper down, instead of sliding smoothly under them.
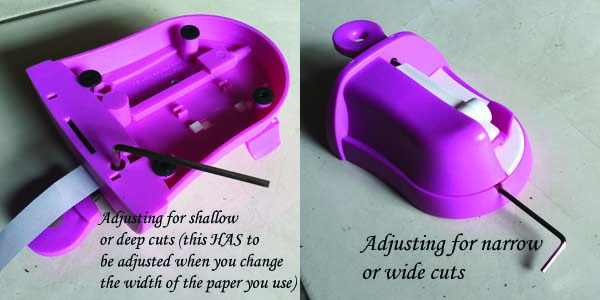
the cool things about this safety quilling fringer is that it is so easily adjusted! It comes with a hex tool that you keep clipped underneath the fringer. There are two places to adjust. In the left photo below is the adjustment for how deep your cut is. If you are using 1/4″ width paper you will not want it to cut as much as if you were using 3/4″ width paper! In the right photo below is the adjustment for how wide you want your cuts to be. If you want them to be very close together, or further apart.
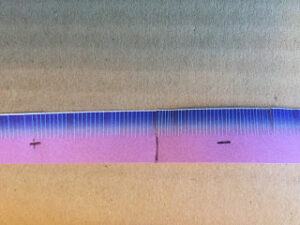
In this photo below I adjusted the width of the cuts in the middle of cutting a piece so you can see the difference. I prefer the wide cuts, as with the narrow cuts it takes a much longer time to finish fringing one strip! It can be a cool effect if you want the narrow ones, though.
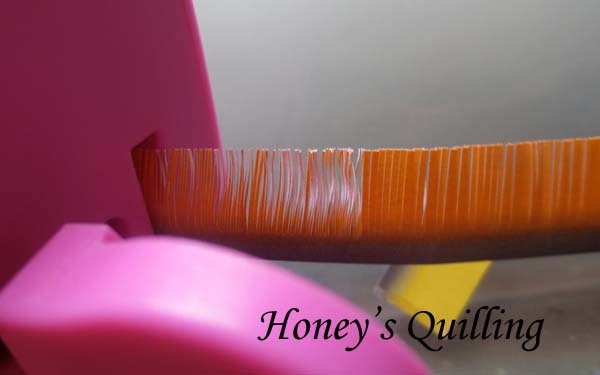
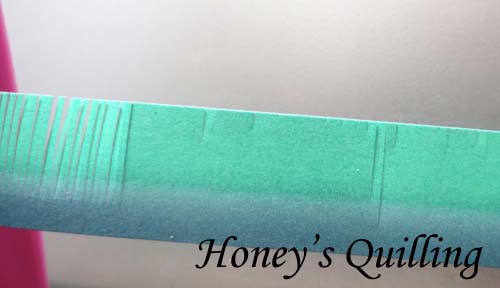
But you don’t want your cuts to be TOO deep or you will just chop up your strip into little bits like you can see in this photo below! It can take a few tries to get the settings you need for the width of paper you are using, but then once you get it, you don’t have to change it unless you start using a different width of paper.
This fringer was easy for my 8 year old to use. After I showed her how to use it, she was able to insert the paper, fringe it, roll it, and make her flowers! Here is a picture of her using the fringer:
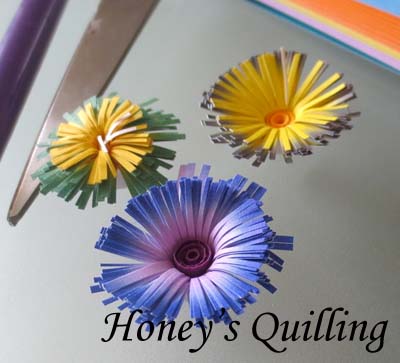
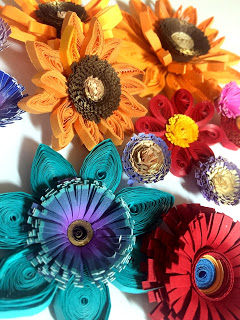
Here are some of Svara’s flowers:
My 3 year old was also super excited to give it a try:
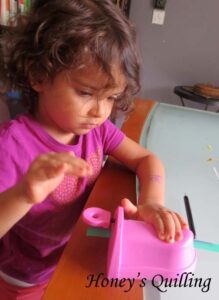
She had more difficulty, though, in pressing the blade down all the way. When she fringes, it ends up looking like
So if you are letting your young child give it a try, make sure you check to see whether they are fully pressing down the handle each time
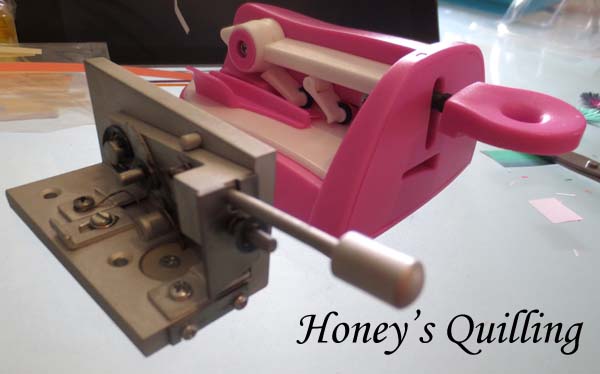
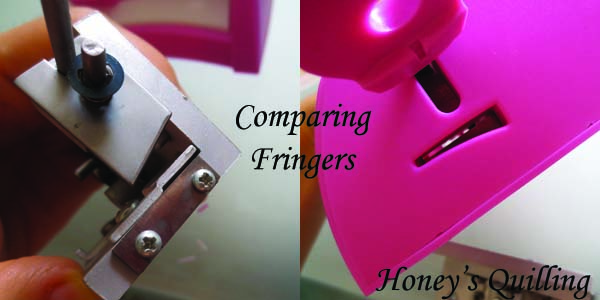
This safety quilling fringer is in a class of its own when compared to a standard fringer! As you can see in this photo, the safety fringer is much larger, and easier to handle.
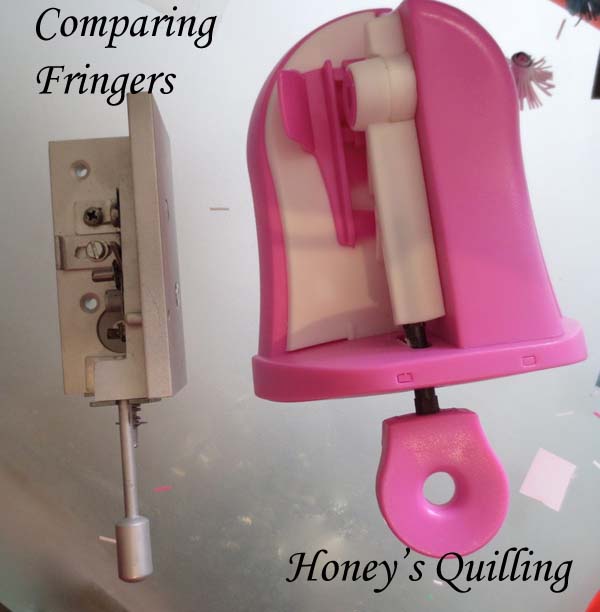
The most important difference is the SAFETY of these! I won’t let my children touch the original fringer. Just look at that sharp blade waiting for an accident, eeks!! But with the safety fringer kids (and adults!) can easily and safely make fringed flowers. yay!
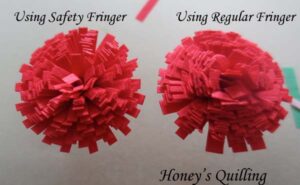
Another major difference is that the original fringer cannot easily do very wide paper. I wanted to compare how both fringers handled a 1/4″ width paper, so I fringed a piece with each one and made it into a flower. The one made with the safety quilling fringer is on the left and the regular fringer is on the right. The safety fringer made more even fringes, and I was able to easily adjust the depth of the fringe to how I wanted it. Therefore it cut a bit deeper and made an overall nicer looking flower! With the regular fringer the fringes weren’t quite as deep, so it was a lot more stiff in the middle and harder to spread out. I think you can use paper that is a bit wider than 1/4″ in the regular fringer, but you have to get out a screwdriver and adjust some of those things on top. It’s not very convenient, though. And you can not fringe a paper that is 1/2″ to 3/4″ wide with it. (some brands can, but the one I have cannot unless I just have no idea how to adjust it properly, which is quite possible!)
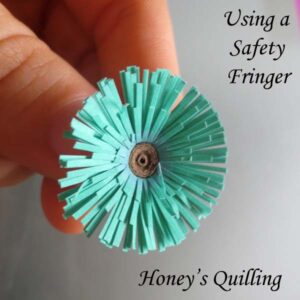
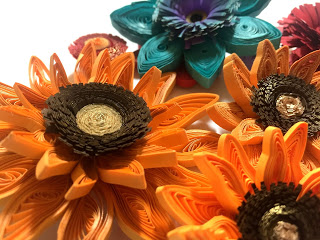
One of the ideas given in the instructions is to cut the edge of the fringed paper at an angle (after fringing!) to make petals that are tapered/different lengths. I did that and then glued a 1/8″ wide strip to the end to be the center of the flower.
Here is how the flower looks when it’s all rolled up and flattened. I love the look with the tapered petals!
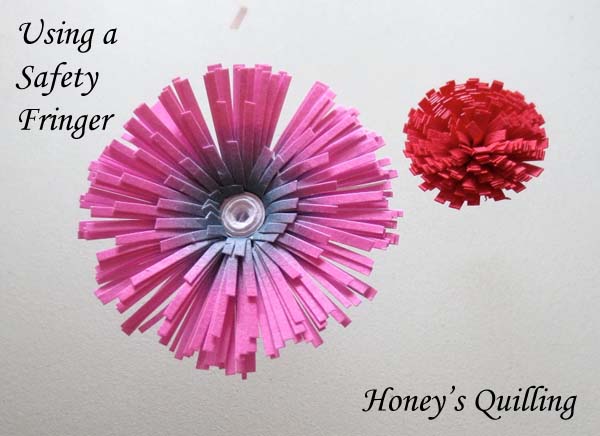
Here is a comparison between a flower that uses 15mm width paper and 6mm width paper. Quite a size difference!
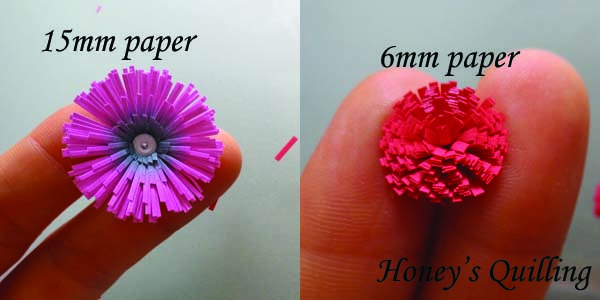
Here they are next to each other:
The paper that Jonathan sent me was 15mm wide (just over 1/2″). He has the same papers in 9mm, 12mm, and 18mm as well. They are cool because they have a different color on one side to give some color to the center of your petals. Some of the wider ones even have 3 colors so the tips of your flowers are colored! You can find the papers on Jonathan’s site. He has the multi color ones as well as others. The papers that Jonathan sent me are a heavier weight paper than the quilling paper I normally work with. I found that to be a good thing with the fringer as it was easier to get the papers in. When I cut my own paper (I wanted some flowers of a particular color) it was a little bit more fussy to get the papers in because they have more of a tendency to bend. So if you are ordering the tool directly from Jonathan’s site, I would grab some papers in different widths as well!!
When choosing paper for this fringer, I find that mm are a more accurate measurement instead of inches. I tried to cut paper that was 3/4″ width, but it is slightly wider than the 18mm maximum width, so I had to trim them a little. So if you want to make the biggest flowers possible, measure your paper in mm!
The safety fringer is not yet as widely available as some other quilling supplies, but there are still some places where you can find one.
One of Jonathan’s goals when creating this safety fringer was that he wanted it to work ALL the time, no problems! I’d say that as far as possible he has attained his goal. I did have two issues, but one was my daughter’s mistake and the other was not fully reading the instructions.
All in all I am super happy with this safety fringer and am really glad to have it as one of my quilling tools! My daughters are as well. My 3 year old says “I want to make flowers!” every time she sees it! Usually I’ll do the fringing and rolling and then I’ll let her spread apart the fringes to make the flower.
I would never pay the money for a traditional metal fringer, but this exceptional tool is well worth the money if you love to fringe! Seriously, it surpasses the regular metal fringer by leaps and bounds and is a quality and modern quilling tool worthy to be in your collection!
In my next post I’ll share the first project I made with my fringed flowers!
I hope you enjoyed this review. Have you ever used a quilling fringer? What were your thoughts about it. Are you interested in one of these safety fringers?
Stick around and check out some of the other fun stuff on the blog!
*The quilling fringer and graduated papers were sent to me free of charge by Jonathan Mayne. All thoughts and opinions are my own.

By: Amelia
Jonathan Mayne has come out with a SafetyFringer. A fantastic creation which i had the opportunity to review.
A fringer is a quilling tool that fringes paper strips for you.
What we have widely available in the market are the metal fringers that cut either 90 degrees or 45 degrees. I have a metal 90 degree fringer and it took a bit to learn how to use it. Plus its tedious and my fingers do tire fringing with the metal fringers. There are scissors that also fringe – so you have a variety of tools out there.
However Jonathan hit on a crucial issue with these existing fringers. They were tedious to use and a little hard on the hands as its a repetitive motion of pushing the handle down. It was especially hard on older hands. And there was also the safety factor. I would never let my 10 year old touch the metal fringer i have. However he was able to use this fringer easily. By himself. He infact enjoyed using this to help me with my fringed flowers.
Jonathan graciously asked me to review this fringer as he hopes to make this readily available in the US.
Along with the fringer i got a free pack of beautiful graduated quilling paper. This paper is truly beautiful with the graduation creating a wonderful pop.
The blue flower below uses one of the graduated papers as the center. The rest of the flowers also used fringed centers and i love the effect.
The fringer comes with instructions and a little tool that helps you adjust the width of the paper cut and the length.
The fringer came with a graduated paper strip in it partially fringed, which made it easy to understand how to insert the quilling paper to fringe.
1/4″ paper fringed
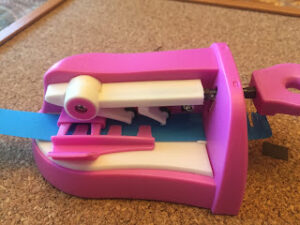
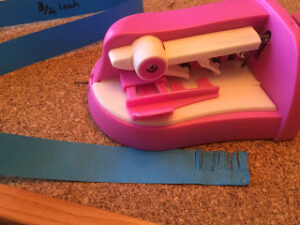
The key points were that the paper strip has to be straight with no ridges or folds when you feed it into the fringer. That way the paper glides in without too much of difficulty. As with all new things you have to get used to smoothly gliding in the paper by adjusting the paper guide levers correctly. You have to slide the paper guide – the pink levers in the picture – to fit the paper width you place in.
Once you have the paper in place – you start fringing. You instantly notice you don’t have to press too hard to fringe. Which is a big advantage for young hands and old hands alike.
This shows the difference when you adjust the distance between the cuts. I did not make too much of a difference between the cuts.
Jonathan Mayne has come out with a SafetyFringer. A fantastic creation which i had the opportunity to review.
A fringer is a quilling tool that fringes paper strips for you.
What we have widely available in the market are the metal fringers that cut either 90 degrees or 45 degrees. I have a metal 90 degree fringer and it took a bit to learn how to use it. Plus its tedious and my fingers do tire fringing with the metal fringers. There are scissors that also fringe – so you have a variety of tools out there.
However Jonathan hit on a crucial issue with these existing fringers. They were tedious to use and a little hard on the hands as its a repetitive motion of pushing the handle down. It was especially hard on older hands. And there was also the safety factor. I would never let my 10 year old touch the metal fringer i have. However he was able to use this fringer easily. By himself. He infact enjoyed using this to help me with my fringed flowers.
Jonathan graciously asked me to review this fringer as he hopes to make this readily available in the US.
Along with the fringer i got a free pack of beautiful graduated quilling paper. This paper is truly beautiful with the graduation creating a wonderful pop.
The blue flower below uses one of the graduated papers as the center. The rest of the flowers also used fringed centers and i love the effect.


The fringer comes with instructions and a little tool that helps you adjust the width of the paper cut and the length.

The fringer came with a graduated paper strip in it partially fringed, which made it easy to understand how to insert the quilling paper to fringe.

I tried 3 different widths of paper ranging from 1/4″ to 3/4″

1/4″ paper fringed

The key points were that the paper strip has to be straight with no ridges or folds when you feed it into the fringer. That way the paper glides in without too much of difficulty. As with all new things you have to get used to smoothly gliding in the paper by adjusting the paper guide levers correctly. You have to slide the paper guide – the pink levers in the picture – to fit the paper width you place in.
Once you have the paper in place – you start fringing. You instantly notice you don’t have to press too hard to fringe. Which is a big advantage for young hands and old hands alike.

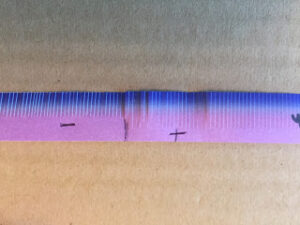
This shows the difference when you adjust the distance between the cuts. I did not make too much of a difference between the cuts.

This shows the difference when you adjust the length of each cut
Once i got the idea of how to make the adjustments – it got easier. The hex screw being easy to manipulate. I only wish there were the + and – marks on the tool itself. That would have taken away the guess work.
The 1/4″ and the 1/2″ papers worked well.
I did have a problem with the 3/4″ papers. I am not sure if it was that the paper was not exactly the size it should have been. These are all pre cut papers i got so it wasn’t me messing up the paper width
The 3/4″ paper would not go in smoothly – it was a tad bit too wide. So i did mess up the strip.
But other than that – it worked like a breeze, and i really likes the light weight and ease of use part. Definitely highly recommend this fringer. And i totally LOVE the graduated paper.
I am making a big quilled piece with my flowers – and ALL of them have my fringed centers.
Thank you Jonathan for giving me the opportunity to review your wonderful product.
PROS
CONS
The safety fringer is not widely available yet, but there are still several places where you can find one.
Please visit Jonathan’s site and take a look at his fringer as well as the paper he offers.
